
FS Reloading Blogs
First Time Reloading - Part I
First Time Reloading
Part I — "Bench Time"
By Travis Peacock
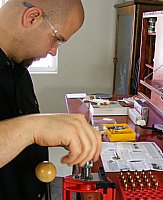
 I've been wanting to get into reloading for a long time and so I've been saving my spent cases in anticipation of reloading them. But for many years, I didn't know what tools I needed or how to begin. I just knew, some day I would reload all that empty brass. Then one Christmas I received a most wonderful gift—a Lee Precision 50th anniversary Reloading kit, a Lee Precision Load All II and several reloading how-to books including the well known Modern Reloading Second Edition by Richard Lee and The ABCs of Reloading by Rodney James. After reading the books and building a sturdy reloading bench based on the plans in Rodney James' The ABCs of Reloading (That's me at my bench in the photo at right), I finally had everything in place to start loading my own ammunition.
I am not going to lie, even though I had everything I needed and had done a lot of reading and researching, I was still apprehensive about reloading my own ammo. Everything I'd read lead me to believe so long as you are careful and pay attention to what you are doing, reloading is a fun and safe hobby. But I still remembered hearing horror stories about the mishaps that can happen when things don't go exactly right. So, as you can imagine, I was a little concerned. I also mistakenly thought reloading would be a hard, long and tedious process requiring a lot of patience. Perhaps you can imagine my surprise at how easy and fun my first round of reloads turned out to be. So much fun, in fact, I was left wanting to load more right then and there.
It occurred to me, others may be having similar fears, so I decided to share my first time reloading experience. I hope you find it entertaining and helpful.
 I decided I would load .243 ammo on my first try because I've saved up a lot of .243 brass over the years. I own a bolt action and a lever action gun in .243 caliber and do quite a bit of shooting with both guns so the empty brass piles up.
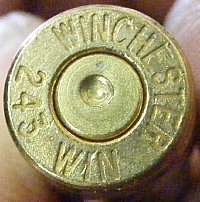
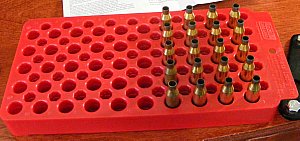
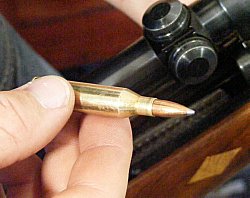
My first challenge was deciding what my first loads should be. Should I play it safe with a lightly loaded 70 grain bullet for varmints, ramp it up with a max powder charge behind a 115 grain bullet or go somewhere in between? As I was pondering the possibilities, I found myself staring at a partially empty box of 80 Grain Winchester .243 factory ammo. The choice became clear. If I loaded up some 80 grain bullets, I could compare the results to the Winchester 80 grain factory loads in that partly empty box. Because I had saved the spent brass from the same box of Winchester factory loads, I determined to use them for my first stab at reloading (You can see the headstamp on one of those Winchester cases in the photo at left).
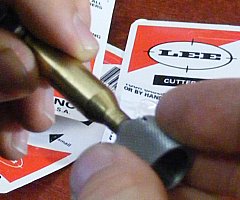
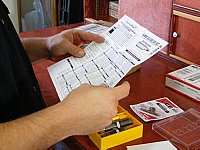 The rest of my quandary was solved when I opened the Lee Precision Pacesetter .243 3-Die Set. Inside the die box, on top of the Lee dies, I found a handy load data table like the one shown in the photo at right. A quick glance at the first load in the charge table told me what powder to buy to match up with the powder dipper included in the Lee die set, in this case it was Winchester 760 Ball Powder. My choice was confirmed by Richard Lee's Modern Reloading book which advises you to start with the load at the top of the table. The Lee documentation also suggested CCI primers are safest in Lee Priming Tools. And being new to all this, I decided to play it safe.
So with the powder and primer issue decided, I went down to the local Ace Hardware store to pick up everything I would need. I grabbed a bottle of Winchester 760 Ball Powder, a box of Sierra Varminter 80 gr. Sbt bullets and a box of CCI no. 200 large rifle primers from the Ace Hardware shelves and headed home to load my first ever rifle cartridge.
Now came the part I had been nervous and exited about for many years—assembling my very own ammo. The First step, case preparation, was by far my least favorite task. But it is extremely important if you want consistent, reliable and accurate loads. Case preparation also took the most time. However, I'm sure with practice and some tips from my reloading buddies it will get a lot easier and faster.
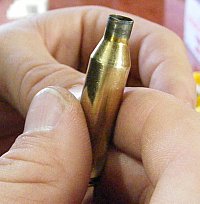 I carefully inspected the 20 spent Winchester cases I planned to use and was pleased to find I didn't have to discard any of them for any reason. The next step was to apply the Lee Precision Resizing Lube that came packaged with my Lee Precision 50th Anniversary Kit. The easiest way I found to do this was to squeeze out a small amount of lube on a flat lid that I had lying around and then just use my fingers to apply it to the outside of the case. For the inside of the case neck I used a cotton swab. I have since found better ways, but the important thing is to lube the cases, otherwise they will most likely seize in the resizing die.
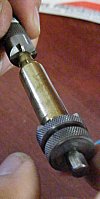
The Lee Precision Rifle Die Set I received from Santa offers two different options for case sizing. You can either use Lee's Full Length Sizing Die or use the Lee Precision Collet Die which only sizes the case neck. I read full length sizing would ensure the cases would work in any .243 rifle so I choose to use the Lee Precision Full Length Sizing Die because my brass has been fired in two different guns and I will be shooting my reloads in both those guns. After reading the Lee Resizing Die setup instructions and setting the die to the correct height, I ran my first case up into the die and was surprised and a little chagrined by what happened next.
 When I lowered the case down after resizing, the whole decapper pin came down and stayed inside the case. This didn't seem right. Obviously I had missed something in the set up. So I reread the instructions and spent some time figuring out how to get the decapper pin back out of the case with out damaging or scratching anything. I determined the best way was to loosen the decapper clamp on the top of the die and then use the press to run the case carefully back through the die, realign the pin and the clamp and tighten everything down nice and tight. This time when I brought the case down out of the die everything stayed where it was supposed to. After using a couple wrenches to tighten the clamp and twisting and moving the whole die around I decided to readjust the die height just to be safe. The rest of the cases went through with no problems. Perhaps if I'd paid a little more attention to the instructions I would have realized finger tight was not tight enough.
 |
 |
 |
| Trim the case | Chamfer and debur the case neck | Clean the primer pocket |
 After all the cases where resized and wiped clean, I used the Lee Precision Case Trimmer and Chamfer Tools that were included in the Lee Precision 50th Anniversary Kit to make sure all the cases were trimmed to the correct length. I was impressed by how easy and fast they worked for such a simple design. The Lee documentation says you can chuck the Lock Stud and Shell Holder in the a hand drill to speed up the case trimming process. The clever Lee Precision Zip Trim is another way to speed up the case trimming operation. The pin on the knurled Lock Stud shown in the picture above left is designed just for this purpose. However, since I was only loading 20 cartridges, I just used my hands and it worked great. While trimming my cases, I gave each case a second inspection just to be extra sure they had no defects. Then a quick pass with the Lee Precision Primer Pocket Cleaner shown in the picture above right finished up my case preparation.
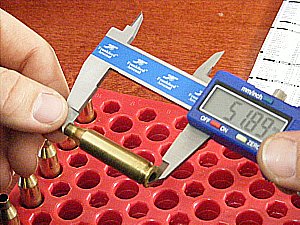
And finally, just to be completely sure, I verified the length of several cases using my handy digital calipers. As you can see in the photo at right, the case length was just about perfect. This extra step with digital calipers may seem like a needless waste of time to an experience reloader, but it really helped increase my confidence that I was doing things correctly. For me, it was time well spent.
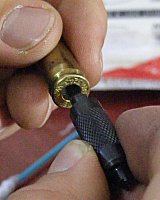
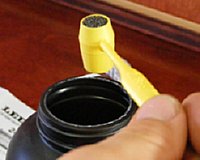
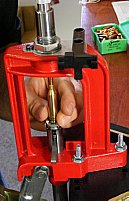
 Priming the cases was the most nerve racking part of the process. It was the part I had dreaded from the begriming. But it turned out to be a lot faster and smoother then I expected. I used Lee's Safety Primer Feed that attached right to the Lee Precision Breech Lock Challenger Press included in my kit. Lee's Safety Primer has a removable tray cover so you can dump the primers right out of the package into the tray without ever having to touch them. Once the primer tray was loaded with primers and placed on the press, a simple in and out motion of the primer arm fed the primers to the cases as you can see in the picture at left. The swing arm lined up to the primmer installer ever time. Lee's Breech Lock Challenger Press primes on the down stroke, so with the primer in position, I moved the handle up to press the primer in to the case.
All the primers fed perfectly except the last one which needed a gentle tap of the arm to move it into position. The Lee Safety Primer worked so good, all my fears about priming just vanished.
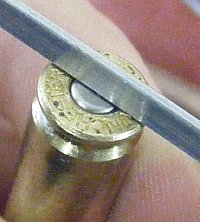 The force needed to seat the primmer fully was very light. The first few primers I verified by using the arm of my digital calipers to ensure the primers where seated flush in the pocket as shown in the photo at right. Finding no problems with primer seating, I decided I only needed to visually inspect the remaining cases at the end of each priming operation. The whole priming process took far less time than I expected. After only a few minutes I had 20 cases, primed, cleaned and sitting in my reloading tray waiting for powder and bullets.
 The next step, charging the cases, is by far the most crucial to insure you have reliable, accurate, and more importantly, safe ammunition to enjoy. During my research, I learned about loading trays. Some people say you are much more likely to accidentally double charge a case when using a loading tray to batch charge cases because, in their minds, it is easy to loose track of which cases have been charged. I can see how that could be a problem. However, in my mind, this is like any other production process. If you focus on what you are doing and avoid distractions, you shouldn't have any problems.
In my research, I found a few methods to prevent double charging cases when using a loading tray. I paid close attention to these methods because the consequences of a double charge are undesirable to say the least. One method is to use loads that fill the case more than half full so a double charge will cause the powder to overflow the case, thus making a double charge immediately obvious. Another method is to place all your empty cases on one side of the loading tray while leaving a couple rows on the other side of the loading tray unused. Then, as you charge cases with powder, move the charged cases from their starting position to the other side of the tray. In this manner, charged cases are always kept separate from uncharged cases. For larger batches, two loading trays could be employed, one for charged cases and another for uncharged cases. I used this second method with one loading tray as shown in the photo above left.
 |
 |
| Dip the powder | Weigh the powder |
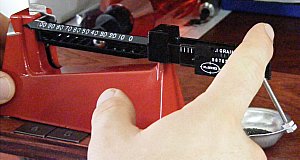
Now that I had my all my cases ready and and waiting for the Winchester 760 powder. I had to choose a powder measuring method. There are several different ways to measure the powder before it goes into the case. I opted to use the Lee Precision Powder Dipper that came with my Lee Precision Pacesetter .243-Die Set as shown in the photo above left because it seemed to be the fastest and most user friendly way to go for the small batch of cartridges I was loading. But being a little paranoid and not wanting to be the next YouTube star with a video of an exploding gun, I decided to use the Lee Precision Safety Scale included in the Lee 50th Anniversary Kit to double check the weight of a few powder charges to insure the powder dipper was providing the exact weight of powder recommended by the load data table (see the photo above right). I wanted to make double sure each load was exactly what it should be.
 The Lee Precision Powder Funnel made pouring the powder into the cases a breeze. It fit on the case and was the just right size to make sure every grain of powder ended up in the case as you can see in the photo at right. I didn't lose any powder onto the table. After each case was charged I moved it to the other side of the load tray so as not to accidentally cause a double charge. For me, this batch method worked great. Remember, this is a hobby, I'm just loading 20 rounds, not supplying an army.
The final step in the process was to seat the bullets on the primed and charged cases. For this batch I chose not to use the Lee Precision Factory Crimp Die because I will only be shooting these cartridges at the local gun range. They won't be stuffed in a pocket or rattling around loose in a glove box, therefore no need for crimping.
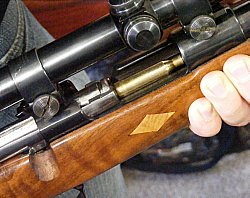
After following the straight forward and easy set up instructions for the Lee Precision Dead length Bullet Seating Die, I used an unprimed, uncharged case to get the correct bullet seating depth. I started out with the adjustment screw on the high end and adjusted it down until I got to the desired bullet depth. Better to be safe than sorry, I thought, so I ran the dummy cartridge through the magazine and chamber of my intended test gun just to make sure there would be no jamming or fitment issues. I wanted to make sure the bullet really wouldn't contact the rifling in my gun when it was chambered. As you can see in the two photos below, the dummy round chambered and ejected normally with no tell-tale marks on the bullet.
 |
 |
| Cycle the dummy round | Inspect the dummy round |
I then seated bullets into all the charged cases. I was surprised at how little effort was required to seat the bullets. Again being somewhat apprehensive, I double checked the overall cartridge length with my handy digital calipers and found it was always very consistent, a testament to the quality of the Lee Precision Reloading Equipment I was learning to appreciate. Now the only thing left to do was take my first ever batch of twenty .243 rounds out to the shooting range and see how they performed compared to the factory loads I was trying to match.
 |
 |
 |
| Set up the die | Seat the bullet | Verify cartridge length |
I learned a lot from my first reloading experience. It turned out to be not nearly the nail biting experience I'd feared. I now feel a lot more comfortable and confident with the art of reloading.
I know many people reload to save money. But for me, the satisfaction of knowing, "I made those", when I look at the 20, freshly loaded .243 rounds staring back at me from the load tray, far outweighs any savings I may have realized over purchasing factory ammo. I'm also looking forward to working up custom loads for each situation I may encounter—loads that can't be bought at any price because I designed them just for me. And I can't wait for the excitement of firing my very own reloads to see how they preform compared to factory ammo. Don't get me wrong, I love saving money as much as the next guy, but as I'm learning, reloading is about much more than just saving a little money.
Stay tuned for part II of my story where I test fire my first 20 reloaded rounds and compare them to Winchester factory loads. Subscribe to our email newsletter to receive notification about my next article and other FS Reloading news.
I would love to hear about your first time reloading experience. If you have any interesting reloading stories you'd like to share with our readers or if you have questions you'd like to ask, please post them in the comments box below. I'll do my best to respond.
Until next time, may you enjoy safe reloading and good shooting.
Travis Peacock
— § —
The rest of this story can be found in:
First Time Reloading Part II — "At The Range"
Leave your comment